On this page
Intro to React
Last reviewed 15 Sept 2026
What is React?
React is a JavaScript library for building user interfaces. It is maintained by Meta and the community. React has a component-based architecture, which lets you break an application into small, encapsulated parts (components) that can be composed to build complex UIs.
React only handles the view layer. For routing, data fetching or global state you add other libraries (React Router, TanStack Query, Redux…) or use a framework built on React such as Next.js or React Router (Remix).
function Greeting({ name }) {  return <h1>Hello, {name}!</h1>;}
function App() {  return (    <div>      <Greeting name="Asha" />      <Greeting name="Rishabh" />    </div>  );}// Renders:// Hello, Asha!// Hello, Rishabh!
React is composable
We build small pieces (components) and put them together to make something larger. A Page can be made of a Header, Sidebar and Article, and each of those can be made of smaller components.
function Page() { return ( <> <Header /> <main> <Sidebar /> <Article /> </main> </> );}Declarative vs imperative
A declarative style, like React’s, lets you describe the UI by saying “it should look like this” for the current state. An imperative style tells the browser “this is what you should do”, step by step.
The benefit of declarative code is that you don’t get bogged down in the details of updating the DOM. You describe the UI for a given state, and React keeps the screen in sync when the state changes — you only have to worry about the state.
| Declarative (React) | Imperative (plain DOM) |
|---|---|
root.render(<h1 className="header">Hello, React</h1>) | const h1 = document.createElement("h1");h1.textContent = "Hello, React";h1.className = "header";document.getElementById("root").appendChild(h1); |
A clearer example — showing a count:
// Declarative: describe the UI for the current statefunction Counter() { const [count, setCount] = useState(0); return <button onClick={() => setCount(count + 1)}>Clicked {count} times</button>;}// Imperative: you update the DOM yourself on every changelet count = 0;const button = document.createElement('button');button.textContent = 'Clicked 0 times';button.addEventListener('click', () => { count++; button.textContent = `Clicked ${count} times`; // must remember to update the DOM});document.body.appendChild(button);Virtual DOM and reconciliation
Updating the real DOM is relatively slow, and updating it by hand is error-prone. React keeps a lightweight JavaScript description of the UI — often called the virtual DOM (React elements).
When state or props change:
- React re-renders the component, producing a new tree of React elements.
- It compares (diffs) the new tree with the previous one. This process is called reconciliation.
- It applies only the necessary changes to the real DOM (the commit phase).
function Clock({ time }) { return ( <div> <h1>Current time</h1> {/* unchanged → DOM node is left alone */} <p>{time}</p> {/* changed → only this text node is updated */} </div> );}Since React 16, the reconciliation engine is called Fiber. It can split rendering work into small units, pause it, and give priority to urgent updates like typing — this is what makes React 18’s concurrent features possible.
Note: the virtual DOM doesn’t make React automatically faster than hand-written DOM code. Its benefit is that you write simple declarative code and still get efficient enough updates. (See Lists and Keys for how the diffing algorithm works.)
Data binding
There are two types of data binding:
- One-way data binding
- Two-way data binding
One-way data binding means data flows in one direction: from state to the UI. Changes in the data automatically update the UI, but changes in the UI don’t automatically update the data. In React, data flows down from parent to child through props, and a component re-renders when its state changes.
Two-way data binding means changes in the UI automatically update the data, and changes in the data automatically update the UI (like Angular’s [(ngModel)] or Vue’s v-model). React doesn’t have built-in two-way binding. You get the same result with controlled components — the input shows the state (value), and an event handler updates the state (onChange).
function NameForm() {  const [name, setName] = useState('');
  return (    <>      <input value={name} onChange={e => setName(e.target.value)} /> {/* UI → state */}      <p>Hello, {name}</p>                                            {/* state → UI */}    </>  );}
Advantages of React
- Component-based: we split the UI into components (for example a
Header, aSidebar, and anArticleContentcomponent). We don’t build the entire page as one big piece — we build these small building blocks on their own. - Easier teamwork: different people can work on different components.
- Manageable code: even if we’re working alone, it’s easier to keep code organized. If we change the headline later, we only update that component; we don’t have to search the whole page’s code.
- Reusability: we write a component once and reuse it. For example, a
ListItemcomponent can be used to render every item in a list. - Declarative:
- Tell React what you want, and React builds the actual UI.
- React efficiently updates and re-renders components when data changes.
- DOM updates are handled for you.
- Rich client-side interactivity: the app can update the page without asking the server for a new page each time.
- Huge ecosystem and community: routing, forms, data fetching, testing and UI libraries, plus React Native for mobile apps.
- Learn once, write anywhere: the same concepts work for web (React DOM), mobile (React Native) and server rendering (Next.js).
React vs Angular
| React | Angular | |
|---|---|---|
| Type | UI library | full framework (routing, forms, HTTP, DI built in) |
| Language | JavaScript or TypeScript + JSX | TypeScript + HTML templates |
| Data binding | one-way (two-way via controlled components) | two-way binding available ([(ngModel)]) |
| DOM updates | virtual DOM + reconciliation | change detection (Signals in newer versions) updating the real DOM |
| Flexibility | choose your own libraries | opinionated, “batteries included” |
| Learning curve | smaller core, easy if you know JavaScript | steeper (RxJS, DI, modules, decorators) |
- Data binding: React uses one-way data flow, which makes it easier to track where data changes. Angular supports two-way binding.
- Performance: both are fast for real-world apps. React’s virtual DOM avoids unnecessary DOM updates; Angular has its own optimized change detection. “React is faster than Angular” is too simple — it depends on the app.
- Flexibility and freedom: React’s large ecosystem lets you choose the tools you want, which is one reason it’s so popular.
- Learning curve: React is easier to start with if you already know JavaScript well.
React’s major drawback
React is only a view library, so a real app relies heavily on third-party libraries (routing, state management, forms, data fetching). Developers have to choose between many options and keep checking that those libraries stay compatible with new React versions, which increases effort. Other drawbacks:
- Fast-changing ecosystem and best practices (class components → hooks → Server Components).
- JSX and build tooling add a learning step for beginners.
- A client-only React app needs extra work for SEO and fast first load (solved by frameworks like Next.js).
Babel
Babel is a JavaScript compiler (transpiler) that converts modern JavaScript (and JSX) into code that older browsers and environments understand.
Main things Babel can do:
- Transform syntax — e.g. arrow functions, optional chaining, JSX.
- Polyfill features missing in the target environment (through a third-party polyfill such as
core-js). - Source code transformations (codemods).
Common presets: @babel/preset-env (modern JavaScript for your target browsers) and @babel/preset-react (JSX).
// Babel input: ES2015 arrow function[1, 2, 3].map(n => n + 1);
// Babel output: ES5 equivalent[1, 2, 3].map(function (n) {  return n + 1;});
// Babel input: JSXconst element = <h1 className="title">Hello</h1>;
// Babel output (React 17+ automatic JSX runtime)import { jsx as _jsx } from "react/jsx-runtime";const element = _jsx("h1", { className: "title", children: "Hello" });Today many tools use faster compilers written in Rust or Go (SWC, esbuild, Oxc) for the same job, but the concept is the same.
Webpack
Webpack is a module bundler. It starts from an entry file, follows every import, and bundles your JavaScript, CSS, images and other files into optimized files for the browser. It has two main extension points — loaders and plugins.
- Loaders transform individual files as they are imported (“loaded”). For example,
babel-loadertranspiles JS/JSX,css-loaderlets youimport './style.css',style-loaderinjects that CSS into the page with<style>tags, andsass-loadercompiles SASS to CSS. - Plugins hook into the whole build process and can do things loaders can’t. A plugin is an object with an
applymethod that webpack calls with access to the entire compilation lifecycle. For example,HtmlWebpackPlugingenerates the HTML file, andTerserPluginminifies the output (it replaced the older UglifyJS plugin).
React project using webpack (manual setup)
This setup is useful to understand what tools like Vite do for you. For new projects, use Vite or a framework (see below).
Step 1: Create a package.json file
mkdir projectnamecd projectnamenpm init -y # creates package.jsonStep 2: Install react and react-dom
npm i react react-domStep 3: Install Babel
npm i -D @babel/core @babel/preset-env @babel/preset-react babel-loader- @babel/core contains the core functionality of Babel.
- @babel/preset-env lets you use the latest JavaScript without micromanaging which syntax transforms your target browsers need.
- @babel/preset-react transforms JSX.
- babel-loader is used by webpack to run Babel on your files.
(Older setups also installed @babel/plugin-proposal-class-properties for class fields like state = {}. Class fields are now standard and included in @babel/preset-env, so it’s no longer needed.)
Step 4: Create a Babel config file (.babelrc)
Here we tell @babel/preset-env which browsers to support, and to leave import/export alone ("modules": false) so webpack can handle modules (and remove unused code). We also add @babel/preset-react for JSX, using the automatic runtime so you don’t need import React in every file.
{ "presets": [ ["@babel/preset-env", { "modules": false, "targets": "> 0.5%, last 2 versions, not dead" }], ["@babel/preset-react", { "runtime": "automatic" }] ]}Step 5: Install webpack and the dev server
npm i -D webpack webpack-cli webpack-dev-server html-webpack-plugin(path is a built-in Node.js module, so it doesn’t need to be installed.)
Step 6: Create directories and files
Create src and public folders, an HTML file public/index.html, the entry file src/index.js, and a component file src/App.js.
mkdir src publictouch src/index.js src/App.js public/index.htmlStep 7: Set up webpack.config.js
html-webpack-plugin uses your custom index.html and injects the bundled script into it. (If you don’t pass a template, it generates a basic HTML5 file that includes all bundles.)
Webpack only understands JavaScript and JSON by default, so we add loaders for CSS and images:
npm i -D style-loader css-loaderconst HtmlWebpackPlugin = require('html-webpack-plugin');const path = require('path');
module.exports = { entry: './src/index.js', output: { path: path.resolve(__dirname, 'dist'), filename: 'main.[contenthash].js', publicPath: '/', clean: true }, resolve: { extensions: ['.js', '.jsx'] }, devServer: { historyApiFallback: true }, module: { rules: [ { test: /\.jsx?$/, exclude: /node_modules/, use: 'babel-loader' }, { test: /\.css$/, use: ['style-loader', 'css-loader'] }, { test: /\.(png|jpe?g|svg|gif)$/, type: 'asset/resource' // built-in in webpack 5 (replaces file-loader) } ] }, plugins: [ new HtmlWebpackPlugin({ template: path.resolve(__dirname, 'public/index.html') }) ]};Notice historyApiFallback: true and publicPath: '/':
historyApiFallbackmakes the dev server returnindex.htmlfor unknown URLs. Without it, if you add routes with React Router and open/dashboarddirectly, the browser requests/dashboardfrom the server, which has no such file → 404. With it,index.htmlloads, and React Router shows the right page.publicPathis the base path for all assets. With'/', scripts load from/main.jseven when you’re on a nested URL like/users/5.
Step 8: Create a React component (src/App.js)
function App() {  return <div>My App Component</div>;}
export default App;
(The original notes used a class component. Function components with hooks are the modern standard.)
Step 9: Create a div#root inside public/index.html
<!DOCTYPE html><html lang="en"> <head> <meta charset="UTF-8" /> <meta name="viewport" content="width=device-width, initial-scale=1.0" /> <title>React App</title> </head> <body> <div id="root"></div> <!-- html-webpack-plugin injects the <script> tag automatically --> </body></html>Step 10: Render the App component into the DOM
import { createRoot } from 'react-dom/client';import App from './App';
const root = createRoot(document.getElementById('root'));root.render(<App />);
Note: older code uses ReactDOM.render(<App />, document.getElementById('root')). It was deprecated in React 18 and removed in React 19 — use createRoot.
Step 11: Add scripts to package.json
"scripts": { "dev": "webpack serve --mode=development --open", "build": "webpack --mode=production"}Now run the dev server:
npm run devReact project using Create React App (deprecated)
npx create-react-app project_namenpx is an npm package runner. It can run any package from the npm registry without installing it globally first.
Create React App (CRA) was officially deprecated in February 2025. It was slow, installed many dependencies, and is no longer maintained. You’ll still see it in older projects and tutorials. For new apps, use Vite or a framework.
React project using Vite (recommended for SPAs)
Vite is a build tool that gives a faster, leaner development experience. It has two main parts:
- A dev server that serves your source files as native ES modules, with extremely fast Hot Module Replacement (HMR) — only the changed module is reloaded.
- A build command that bundles your code for production into highly optimized static files.
npm create vite@latest my-app -- --template reactcd my-appnpm installnpm run devThen follow the prompts (you can also choose react-ts for TypeScript).
For full-stack apps with routing, server rendering and data loading, the React team recommends a framework such as Next.js or React Router (framework mode):
npx create-next-app@latestUnderstand package.json
package.json stores the project’s metadata and the list of packages it depends on. It makes it easy for others to install the same packages and run the project.
A package.json file:
- lists the packages your project depends on,
- specifies which versions of those packages your project can use,
- defines scripts like
dev,buildandtest, - makes your build reproducible, and therefore easier to share with other developers.
A package.json file may look similar to this: 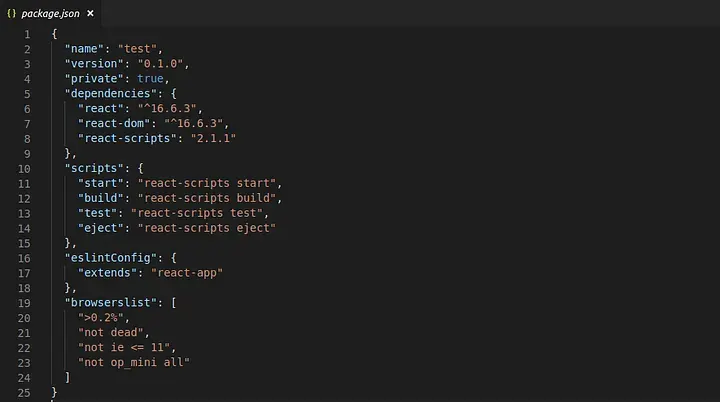
- name — the name of your app. It must be lowercase, and may contain hyphens and underscores.
- version — the current version, in the form
major.minor.patch(e.g.0.1.0). - “private”: true — npm will refuse to publish the package. This prevents accidentally publishing a private project.
- dependencies — packages needed to run the app in production (e.g.
react,react-dom). - devDependencies — packages needed only during development and build (e.g.
vite,eslint, testing tools). - scripts — commands you run with
npm run <name>.
Version ranges (semver):
| Written as | Means | Example allowed versions |
|---|---|---|
^16.6.3 | same major, newest minor/patch | 16.6.3 … 16.14.0 (not 17.0.0) |
~5.6.7 | same major and minor, newest patch | 5.6.7 … 5.6.9 (not 5.7.0) |
5.6.7 | exactly this version | 5.6.7 |
The exact installed versions are locked in package-lock.json, so everyone gets the same versions.
npm install <package> saves it to dependencies automatically (the old --save flag is the default since npm 5). Use -D (--save-dev) for devDependencies.